Home and Learn - Free Excel VBA Course
1.2 The Excel Visual Basic for Applications Development Environment
There are a few ways to open up the VBA Editor in Excel. From the Developer tab, on the Code panel, you can click the Visual Basic button. On the Controls panel of the Developer tab, you can click View Code. A keyboard shortcut is to hold down the left ALT key on your keyboard. Keep it held down and press the F11 key.
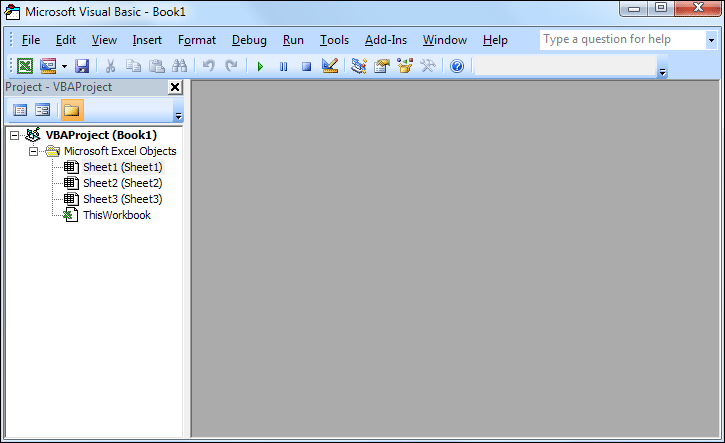
Whichever method you choose you should see a screen like this one:

It's a little daunting at first glance. But the more your work with the editor the less daunting it will become.
There are a few things to notice about the editor. Firstly, there's an area on the left called Project - VBA Project. In the white area are all the object that your project currently has (we'll get into what object are a little later). By default, there are three Sheet objects: Sheet1, Sheet2, and Sheet3 (Excel 2013 and 2016 only have 1 worksheet by default, so you only see Sheet1 in this version). These obviously represent the Excel worksheets. The fourth object is called ThisWorkbook and refers to the workbook where all your current macros are. There's also individual items for each worksheet.
One other object not visible above is called the Personal Macro Workbook. This workbook will appear as soon as you record a macro. The Personal Workbook can be used to store macros that you use quite frequently. They will be available whenever you close down Excel and open up a new workbook. The other sheet objects are specific to a particular workbook.
The big grey area is where you'll write your code. The reason it's grey above is because no coding window has been opened yet. To open up a coding screen double click an object on your left. Double click the Sheet1 object and you'll see this:

All the macros you'll write need to be typed here, on this white screen. Because we double-clicked Sheet1 the code written here will only affect the worksheet called Sheet1. Likewise, if you add code to Sheet2 it will be run in the worksheet called Sheet2.
To give you a quick idea of what VBA code looks like, add the following in the white area for Sheet1:
Sub HelloWorld()
MsgBox "Hello VBA World!"
End Sub
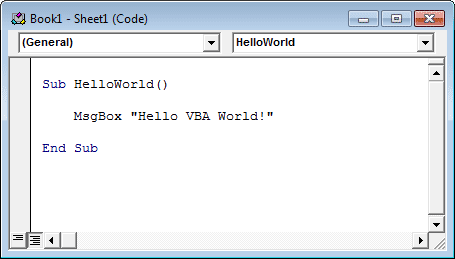
Your coding window will then look like this:

The Sub at the start of our code is short for Subroutine. A Subroutine is just a chunk of code that does a particular job. It has a corresponding End Sub to show where the code chunk ends. (What you should have noticed, though, is that as soon as you typed the first line and hit the Enter key VBA adds the End Sub for itself.)
A Sub needs a name followed by a pair of round brackets. There is a space between Sub and the name. In between Sub and End Sub is where you add the code for your macro. You can have practically anything you like as a name for your Subroutines. But try to keep them related to what the code will be doing. If we'd give our Sub the name Colin, for example, it would be a bit odd, to say the least. The Name HelloWorld describes what the code will do, however.
Subroutines can't contain spaces, though. But you can type an underscore. So this is OK:
Sub Hello_World()
But this is not:
Sub Hello World()
Take note of the following when coming up with a name for your Subroutines:
- They can't start with a number, only alphabetical characters (you can have numbers elsewhere in your names, though)
- You can't have full stops/periods in them
- You can't use any of the following characters anywhere in your names: #, $, %, &, !
Once you've added the code, it's time to run it. To run your code, have a look at the toolbar at the top of the editor. Locate and click the green triangle:
![]()
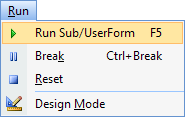
Another way to run your code is to click the Run menu. From the Run menu, select Run Sub/User Form.

A shortcut to run your code is to press the F5 key on your keyboard.
What you should see when the code is run is this:

The MsgBox stands for Message Box. In between double quotes, we type what we wanted the message box to display.
In the next part, you'll use see how to record a Macro and watch what happens when Excel adds the code for you.
Next Lesson: 1.3 Macros >