1.8 Resize
Home and Learn - Free Excel VBA Course
10.4 The Add New Photo Tab
Ongoing tutorial - First part is here: Part One
Click on your Add New Photo tab at the top of your form. You should see a blank page for this tab.
Using the skills you've just learnt in the previous sections, design a page like this one:

This is more or less the same as the last one. The only new control so far is the ComboBox.
ComboBox Control
To add a ComboBox, click the item circled below in the toolbox:

When you draw one out, set the following properties for it:
Text: Camera
Height: 20
Width: 110
Left: 96
Top: 228
Textboxes for the Add New Photo tab
The properties for the labels and textboxes should be the same as last time, except for the Name properties of the Textboxes. Set these as follows:
TextBox1 - Change Name to: tbImageName
TextBox2 - Change Name to: tbDateTaken
TextBox3 - Change Name to: tbInfo
TextBox4- Change Name to: tbDimensions
TextBox5 - Change Name to: tbImageSize
Command Buttons for the Add New Photo tab
Draw two Command Buttons on your Add New Photo tab. Set the Name property of the first one to cmdAddNew. Set its Top property to 12 and its Left property to 282. The Height property should be 36 and the Width property 200.
Set the Name property of the second Command Button to cmdSave. Set its Top property to 300 and its Left property to 24. The Height property should be 36 and the Width property 192.
We're almost done - only one more control to add.
The Open File Dialogue Box Control
The final control to add is not in the toolbox by default, you have to add it
as an extra. This control is the Open File Dialogue Box. However, you'll only be
able to add this control if you have the 32 Bit version of Windows. For 64 Bit
versions, the Open File Dialogue Box Control is no longer available. You can
still add an Open File dialogue box, though, and you'll see how to do this in a
later section. But follow along with the steps below to see if the control is
there. (Don't worry if it's not. Just move on to the next section.)
To
add an Open File Dialogue Box Control to your toolbox, then, from the menu at
the top of the VBA Editor, click on Tools. From the Tools menu,
select Additional Controls:

When you click on Additional Controls you should see a dialogue box appear. Scroll down until you come to Microsoft Common Dialog Controls:
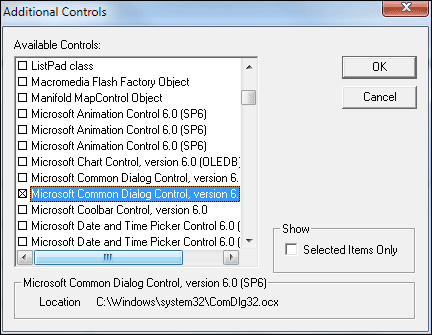
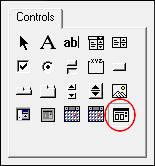
Check the box next to Microsoft Common Dialog Controls and click OK. You should then see the new controls in the toolbox. Select the Open File dialogue box, circled in the image below:
Draw one out somewhere at the bottom your form and it should look like this:

The dialogue box control is not a visible control. What that means is that when you run your form, you won't see it anywhere. The sole purpose of this control is to manipulate dialogue boxes. You'll see how it works when we write the code for it later.
The only property we'd like to change for this control is the Name property. Change it from the default CommonDialog1 to CD1, which is a bit shorter.
And that's the form designed - we can now start coding. We'll do that in the next lesson below.
Next Lesson: 10.5 Initialize >