Home and Learn - Free Excel VBA Course
1.8 The Excel VBA Resize Property
When you use Offset, as we did in the previous lesson, you're selecting a new range of cells based on a starting position. But the starting position will change. If you want to change the size of a range of cells, but keep the starting position, then Resize is the better option. Take the following line of code as an example:
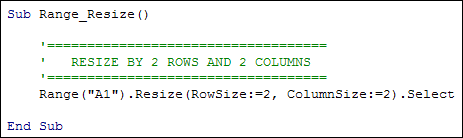
Range("A1").Resize(RowSize:=2, ColumnSize:=2).Select
This is almost identical to the Offset code you used earlier. The only difference is the word Resize instead of Offset. Again we start with a Range (cell A1). In between the round brackets of Resize you type a RowSize and ColumnSize. Like before, though, you can shorten this and just have the numbers between the round brackets:
Range("A1").Resize(2, 2).Select
If you only want to resize the rows then you can miss out the ColumnSize parameter:
Range("A1").Resize(2).Select
If you only want to resize the columns then you can miss out the RowSize parameter:
Range("A1").Resize(, 2).Select
Let's see how Resize works in practice.
Return to your coding window. Set up a new Sub and call it Range_Resize. In between Sub and End Sub, type the following line:
Range("A1").Resize(RowSize:=2, ColumnSize:=2).Select
Your code will then look like this:
Go back to your spreadsheet and add a new button. When the Assign Macro dialogue box appears, select your Range_Resize Sub from the list. Click OK to return to your spreadsheet. Change the text of the button to Range Resize.
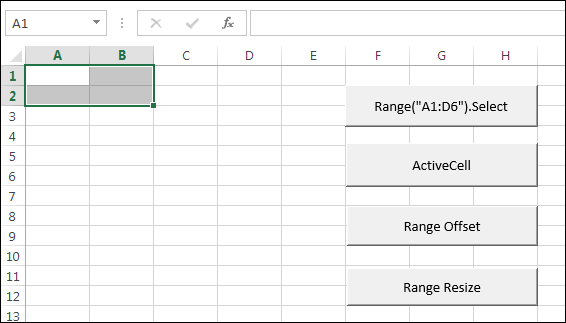
To test out your new button, click inside cell A1 just to highlight your starting position. Now click the button. You should find that the cells A2 to B2 are highlighted:
To get a better understanding of how Resize works, try the following (amend your code one example at a time):
Range("A1").Resize(3, 4).Select
Range("A1").Resize(3).Select
Range("A1").Resize(, 4).Select
Range("A1:A3").Resize(, 2).Select
Notice that the last example uses the cells A1 to A3 for the Range property. The others use A1 as the starting position.
You can also resize AND offset. It's a little trickier to understand, though:
Range("B1").Offset(, -1).Resize(, 3).Select
In the code above, we start with the Range B1. We then offset this by one column to the left (the -1). The Resize then stretches the range of cells 3 columns. Try it and see which cells are selected in the line above.
Exercise
Suppose the selected cell is A2, use Resize to select cells A2 to C2.
OK, we'll move on from Ranges. In the next section, we'll have a look at something called programming variables, and how they work with the Excel VBA language.
Next Lesson: 2.1 Programming Variables >