1.8 Resize
Home and Learn - Free Excel VBA Course
10.6 Getting Data for the Textboxes
Ongoing tutorial - First part is here: Part One
Click back on your View Photo tab in the VBA Editor. Double click the Load Image Information button. This will open up the code stub for that button.
Before we write any code, have a look at the spreadsheet again:

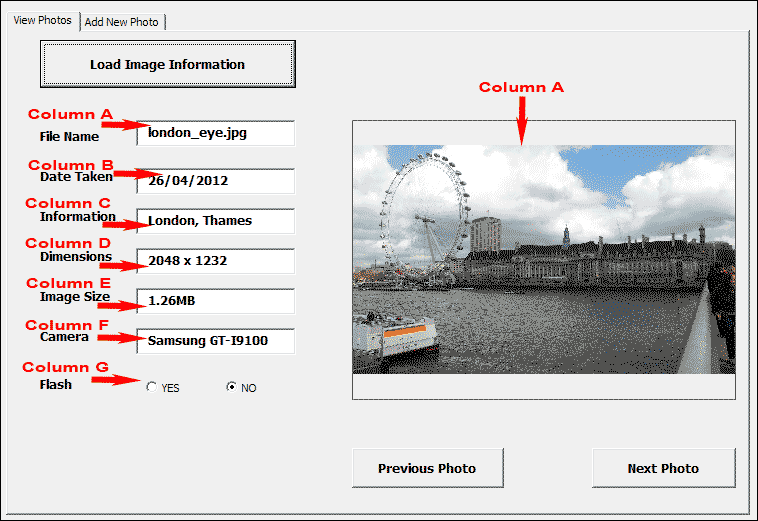
What we're trying to do is to take the information from each cell and place it in the text boxes on the form. For cells in the first column, we also need to take the file name and load that image into the picture box. For the Yes/No cells, we need to activate one of the option buttons. Here's an image of the form showing the data from row 2:

The first job is to test if the active cell is in the first column. Not only that, we need to make sure there is some text in the active cell. We also need to make sure that the active cell is not in row 1, where the headings are. If we don't do that, if the active cell is in Column 2, for example, then we'll get errors.
Testing for Errors in Column A
We can use and If Statement to make sure the ActiveCell is in the correct place. Add the following to your cmdLoad button:
If ActiveCell.Column < > 1 Or ActiveCell.Row = 1 Or ActiveCell.Value = "" Then
Cells(2, 1).Select
End If
The first line is a bit long so let's break it down. The first part of the If Statement is this:
If ActiveCell.Column < > 1
After ActiveCell we have the Column property. This flags up anything this is not Column 1, which is the A Column. Next we have an Or part:
Or ActiveCell.Row = 1
Again, we use ActiveCell. This time, we check the Row property. We want to know if this has a value of 1. If it does then that's an error we need to catch. (It's an error because the headings are on row 1.)
The final part of the If Statement is this:
ActiveCell.Value = ""
We're now checking the Value property of ActiveCell. After an equal sign, we have two double quotes together, with no space between them. This will check for a blank cell.
If any of the three conditions above are true then the code for the If Statement is this:
Cells(2, 1).Select
What this does is to select the cell at position 2, 1, which is the second row in column one. This will ensure that we have an image name selected in the A column.
Get the Data for the Textboxes
We can now go ahead and get the data for the textboxes. Add this line to your code:
Call GetTextBoxData
Here, we're calling a Sub. The name of the Sub is GetTextBoxData. You need to create this. So add the following Sub to your code:
Private Sub GetTextBoxData( )
txtFileName.Text = ActiveCell.Value
txtDate.Text = ActiveCell.Offset(, 1).Value
txtInfo.Text = ActiveCell.Offset(, 2).Value
txtDimensions.Text = ActiveCell.Offset(, 3).Value
txtSize.Text = ActiveCell.Offset(, 4).Value
txtCamera.Text = ActiveCell.Offset(, 5).Value
End Sub
To the left of the equal signs above, we have the name of the six text boxes on our form. Each of these has a Text property that what we want to set.
The first thing we're setting is the Text property for the txtFileName text box. To the right of the equal sign, we have this:
ActiveCell.Value
This just transfers the Value of the ActiveCell to the txtFileName text box. In other words, whatever is in the active cell will end up in the txtFileName text box.
The rest of the lines use the Offset property of the ActiveCell. Here's the second line from the Sub:
txtDate.Text = ActiveCell.Offset(, 1).Value
We're setting the Text property of the txtDate text box. This needs to come from Column B, which is 1 column to the right of the ActiveCell, Column A. We want the Value property of this cell. Notice the comma between the round brackets of Offset - it comes before the 1. VBA takes this to mean that you want to stay on the same Row.
Your coding window should now look like this:

You can test it out, now. Run your form in the usual way. Click your Load Image Information button. You should see the data from the spreadsheet appear in the textboxes.
Return to your coding window and we'll set the value for the option buttons. We'll do that in the next lesson below.
Next Lesson: 10.7 Option Buttons Code >